Showing posts with label crafts. Show all posts

Guest post from my oldest daughter, who put together this activity about communicating climate change to younger children for one of her Environmental Science classes and wanted to share it with parents who might be looking for ways to start this discussion. Art work was done by my daughter and my preschool age niece.


Climate change is a pressing issue that impacts us all, but it is also complex and can be confusing. This set of activities is designed to teach children about certain impacts of climate change in a simplified way and articulate small actions they can take to lessen their own environmental impacts and contribute to mitigating the climate crisis. It includes art activities meant to maintain interest and engagement. Following the lesson script, the activities take about 30-40 minutes to complete.

(To skip the preamble and see the lesson plan, click here.)

Introduction (For Parents or Educators):

We have all heard about climate change: it’s on the news, and it’s a hot political topic in the modern world. It is easy to feel hopeless about a crisis this all-encompassing, but nonetheless, we have to do something. And that something cannot be to solely rely on advancements in technology as our savior. Ultimately, the climate crisis is a social problem that requires social solutions. Some have come to categorize the climate crisis as a “super wicked problem,” meaning that 1) time is running out, 2) those who cause the problem are the ones implementing a solution, 3) a central authority to address the issue is either weak or nonexistent, and 4) there is irrational discounting of the future that leads to a lack of solutions being implemented now. In order to combat a “super wicked problem,” we need “sticky” solutions, ones that are difficult to wriggle out of when times get tough (Reidy 2013).

Usually, the term “sticky” solution is used in the context of legislation. However, in teaching children about climate change and encouraging them to make small changes in their lives to aid the mitigation cause, we instill values that tend to stay with a child throughout their lives. Therefore, teaching about climate change and mitigation during childhood is, in a way, a sticky solution, and one that could be very helpful in curbing the oncoming climate crisis.

Beyond just teaching about climate change, this lesson/set of activities was designed to promote the four things Anderson (2014, 18-19) determined were vital in order to save the environment: generating genuine care for the environment, encouraging learning, valuing diversity and tolerance, and understanding that we are all in this together. The activities encourage empathy, asking the child to put themselves in the shoes of vulnerable communities. With a focus on glacial melt and sea level rise, the activities draw on the stories of two such vulnerable communities: indigenous people in the Andes Mountains (information retrieved from Bolin 2009) and island communities in the Pacific Ocean (information retrieved from McNamera and Gibson 2009). For more information, check out the works cited at the bottom of the post.

What You’ll Need:

  • A paper coffee filter
  • Washable markers
  •   A spray-bottle
  •   A cup with water
  •   A pitcher to pour more water into the partially full cup
  •   A tape measure or yardstick
  •  A sheet of paper to draw on

The script laid out below is designed for preschool and elementary school children, and with slight alteration can work with any age group. You don’t have to follow the script exactly, but the script is written in a way that is intended to emphasize empathy, and skipping over any of the stories in the script would likely detract from that goal.

Lesson Script:

What is your favorite thing about nature?

Well, we want to make sure that sticks around then, don’t we! That way your friends, family, and people in the future can enjoy it as much as you do! But there are things that we do that hurt the planet might make it so that we can’t enjoy _(insert their answer)_ in the future!

Right now, there are things that we do that are making the planet warmer than usual. It might not feel like it all the time, because it can still be cold outside, but there are places in the world where it is really, really hot even when it is cold for you.

And even if it is not super, super hot outside, there can still be problems! Let’s think about it this way. Is it warm right now? No! We’re inside, so the temperature is comfy; it’s not too hot or too cold. But what happens if we put a piece of ice on the table? Even though it isn’t super hot, the ice will still melt. That’s because ice needs to be cold in order to stay ice.

Okay, now I want you to close your eyes and imagine the BIGGEST piece of ice you can imagine. This ice is just HUGE! Bigger than you! Bigger even than this room! Super, super big. When we have ice that big, we call it a glacier. There are glaciers in some of the coldest parts of the world. But those cold places are getting less cold, and do you remember what happens to ice when it gets less cold? It melts.

(Here’s where I started the first activity. Make sure to use washable markers for this part!)

So we’re going to do a little art project now. This is called a coffee filter. It feels pretty funny, right? It’s really thin paper. But we’re going to use it for our project. First, you have to flatten it out. Once it’s all flat, we can draw on it! Let’s try to draw a glacier. How big would your glacier be? What kind of animals or plants are around your glacier?

(While we draw, continue the conversation.)

It’s pretty hard to imagine that much ice melting, right? But it’s happening right now! Glaciers are melting all over the world, and this makes life really difficult for people who live by the glaciers. For example, there are people that live on some pretty big mountains called the Andes mountains. The Andes mountains also have glaciers on them, but those glaciers are melting pretty fast. The people that live there use water from the glaciers to grow their food and to drink. But because the glaciers are melting so fast, they’re not able to get the water they need to drink and to water their plants. The melting of the glaciers can also cause rock falls, landslides, and floods that make it dangerous to go about their lives. That’s why the glaciers melting is a problem.

Alright, are you done drawing your glacier? Let’s see it!


(Here you can compliment or make comments on their drawing.)

Okay, now we’re going to do something to your drawing to make it look like it’s melting, just like the glaciers. Is that okay?

(If it’s not alright or the kid(s) are hesitant to ‘ruin’ their drawing, have them just scribble something onto a different coffee filter.)

So now we take this spray bottle and carefully spray some water on your drawing until the paper is all wet. See how the lines you made are starting to blur a bit? It’s kind of like your drawing is melting, just like the glaciers! Pretty cool, right? Now we have to let it sit so it can dry.


Okay, let’s think about what happens when ice melts. What does that ice turn into? Right, water. So if lots of ice is melting all over the world, what happens then? Now we have a lot more water. Where does that water go? Eventually, it ends up in the oceans. But the more water you put in the ocean, the higher the ocean goes.

(Here, you can use a visual of a cup to make this point. Make sure the cup has some water in it already, but be ready to add more water to the cup as well.)

It’s like this cup. Right now, there’s some water already in the cup, and that’s fine. But if we pour more water in, like water from melted ice, then the cup might eventually overflow with water. The ocean is just a GIANT cup that can hold a lot more water. If we put too much water in, it will eventually overflow and go onto the land.

So what’s bad about the ocean getting bigger? Well, if it gets too big, it can be a problem for people that live close to the water. Right now, sea level rise is expected to be over two feet in some places by the year 2050. That’s not that far from now! You’ll be _(calculate their age)_ years old then.

(Here, you’ll need the measuring stick or whatever you’re using to measure height).

Let’s compare how tall you are to how much taller the ocean could be in 30 years.

(Measure out two feet either directly against the child or against the wall. If you choose to mark it against the wall, I recommend marking it using a sticky note, but a piece of paper with tape or some other easily removable adhesive works, too.)

So, this is two feet. If you stand next to it, you can see how tall the ocean will be for people that live right by the edge of the ocean. That’s pretty crazy, isn’t it! Imagine having to live your life surrounded by that much water!

(Here is where we start the second art activity.)

Okay let’s get some paper and our art supplies back out, because we’re going to try to draw what our lives would look like if we had to live in that much water. Would you be swimming with some fish? Would you share your lunch with some crabs?

(While we draw, continue the conversation.)

So what we are drawing right now is an imagined version of what life would be like. But if you had to live like that every day, it wouldn’t be very fun. How would we get from place to place? Roads and homes would be flooded.

The situation is even worse for people that live on islands. They have nowhere to go! If we let the ocean overflow too much, their entire island – everything they have ever known – could be forced underwater. Most of the people that live on islands don’t want to leave, though, even if it is safer for them to leave. They are attached to their home land, because that is their land and their culture. Nobody wants to be forced to move. And that’s why we all should try to help stop glaciers melting and ocean levels rising.

Alright, let’s see what you have drawn!


(Here, again, do a show and tell and let them explain what is happening in the picture. Make comments and compliments to encourage and engage them.)

If we want to help stop the glaciers from melting so fast and making the oceans rise so much, what can we do? Well, there are certain small things that you, your friends, and your family can all do to help slow the rate at which the Earth is getting warmer. Do you have any ideas of what you can do?

(Let them answer about things they may already know to do to help protect the planet. Here are some examples you can bring up if they don’t mention it: turning off lights whenever possible, turning off the faucet while brushing your teeth or even washing your hands to prevent the wasting of water, biking or walking instead of riding a car, don’t let food go to waste, use reusable bags when shopping. There are, of course, other actions that adults can take, but there are the easiest for kids to get in on the action.)

Lucky for us, we have two very cool art pieces that we can use as reminders. You can hang one up by a light switch to remind you to turn off the lights when you don’t need them. You can put one by the sink to remember to turn the faucet off whenever possible. Whenever you see your drawings, remember all the things you can do to help protect the planet – and help protect the people we talked about today that are affected most by climate change.


Works Cited:

Anderson, E. N. 2014. “Introduction.” In Caring for Place: Ecology, Ideology, and Emotion in Traditional Landscape Management, edited by E. N. Anderson, 14-47. Walnut Creek: Left Coast Press.

Bolin, Inge. 2009. “The Glaciers of the Andes are Melting: Indigenous and Anthropological Knowledge Merge in Restoring Water Resources.” In Anthropology and Climate Change: From Encounters to Action, edited by S. A. Crate and M. Nuttall, 228-239. Walnut Creek: Left Coast Press.

McNamera, Karen Elizabeth and Chris Gibson. 2009. “‘We do not want to leave our land’: Pacific ambassadors at the United Nations resist the category of ‘climate refugees.’” Geoforum 40: 475-483.

Reidy, Chris. 2013. “Climate Change is a Super Wicked Problem.” Plantcentric (blog). May 28, 2013. https://medium.com/@chrisjriedy/climate-change-is-a-super-wicked-problem-b2e2b77d947d.


My grandmother turned 91 in April.  She is the last surviving of her twelve siblings and her whole family loved to play games.  In particular, they loved to play Scrabble.  I've made Grandma different Scrabble gifts before, but wanted to do something extra special this year.  I came across this quilt idea and, although I've never quilted before, decided to make something similar.  I semi-followed the instructions found here, but had to adapt a bit to make it look like a Scrabble board and to get it the size I wanted it.

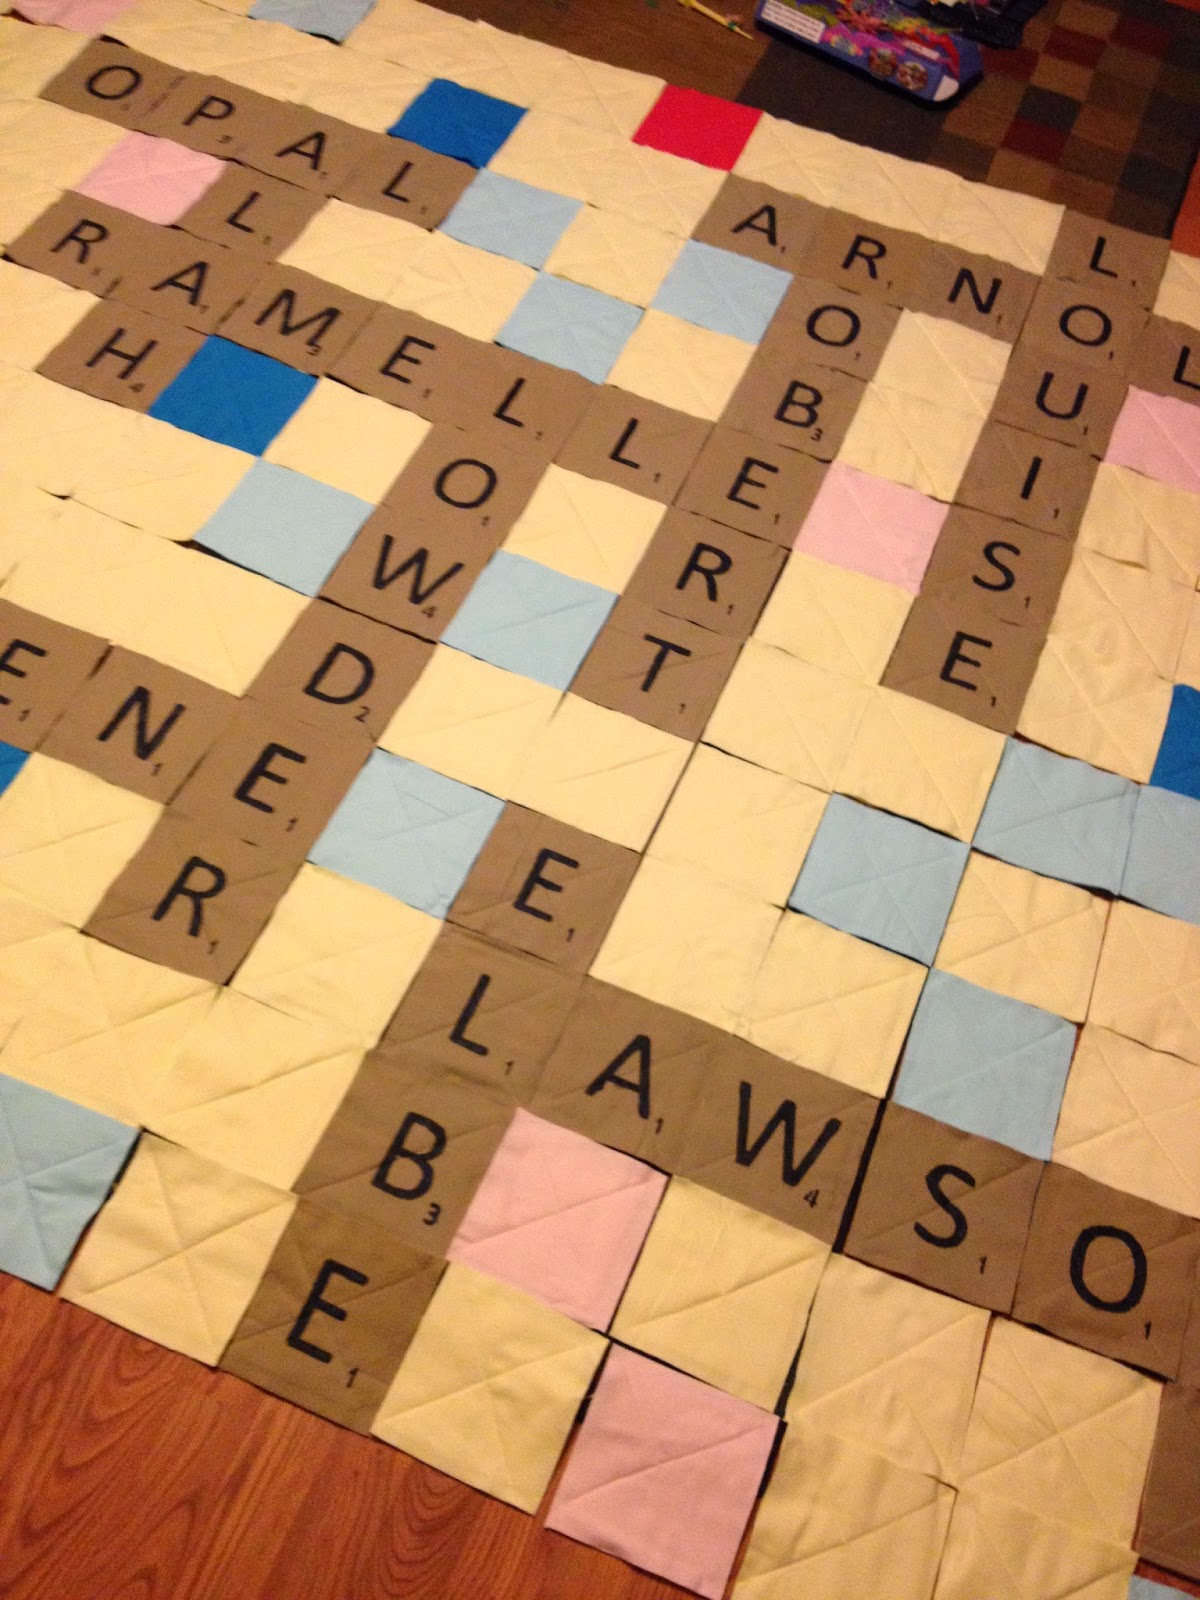
I started planning this back in mid-January.  I used a spreadsheet to lay out the names I wanted to include:  Grandma's maiden name and the names of her parents and twelve siblings.  I drew up a scrabble board on the spreadsheet and colorized the squares so I would know which squares were which.  I knew I wanted to have "LOWDER" span the center square, so I started from there.  It took awhile, but I eventually got them all on.


Next, I counted how many of each color square I would need for both the front and back of the quilt and purchased the fabric.  I started out thinking to make 8x8 squares.  I thought I'd calculated the right amount but once I got cutting, I realized I had underestimated.  I used camel colored flannel for the lettered squares, and then red, dark blue, light blue, and pink flannel for the colored tiles and tan flannel for the blank squares. After two trips to buy fabric and batting, I finally began the process of cutting the squares.


Once the colored squares were cut, I cut a duplicate amount of batting, making each square 2" less than the colored squares.  I created "sandwich" squares by putting the together the correct colored squares with a batting square in the center.  The spreadsheet diagram came in very handy here, when I was trying to match the back color and the front color!  Once I had the sandwiches made, I sewed an "X" across the center of each sandwich.


While not quite as tedious as cutting all the squares, this was still extremely mind numbing.


After finishing the Xes, I realized that my squares were going to be too big, so I cut them down by an inch.  This resulted in a large scrap pile that was very soft!


Once I had the squares sewn and cut to size, I added up the number of each letter I would need and added it to the spreadsheet, making sure to note which letters needed to be painted on which color backing. Remember that the back of the quilt is a blank Scrabble board!  This was more challenging than expected, since apparently I have addition issues...


I used fabric paint and a letter stencil I found at JoAnn's to paint on the letters.


I couldn't find just the right Scrabble font, so I had to free hand some of the areas that were left open on the stencil, but I was pleased with the final product.


After letting the paint dry for two days, I began the process of painting on the letter values.  The stencil kit I'd purchased had the 2, 3 and 4, but no 1, so my husband cut one out for me!  Again using the spreadsheet as a guide, I added the number values to each letter.


Next, I placed the quilt squares in the correct order and did a rough lay out of the quilt.


I stacked each row into a pile and labeled the row number, so I could figure out which was which when I was ready to sew the rows together.


At this point I realized that by cutting the squares down, I had eliminated the ability to have a 3/4 inch seam.  Oops.  I ended up making 1/2 inch-ish seams.  I stitched each square in the row together, making sure to have the letters on the correct side!  Then I pinned the rows together to make sure that my seams for each tile were lined up, then I sewed the rows together.


As the quilt got larger, it was more and more challenging to get the bulk through the machine. 


When everything was stitched together, I began to cut the seams, making a fringe about 1/4 inch deep.  The fringing was a messy job.  Little pieces of thread and flannel were everywhere by the time I was done.  Since my grandma has dementia, I wanted to put a quilt label on so she would know who made the quilt and why.  I looked at the ones that were available at the store, but wasn't impressed.  I decided I'd try to make a simple one using some scrap material I had on hand and a fabric marker.  I used heat and bond to adhere the patch onto the quilt.


Once that was done, I ran the quilt through the wash to get rid of some of the threads and to give the quilt a basic "rag" look.  My mom and I then used a lint remover to take the lint and threads off of the squares before I wrapped up the quilt. 

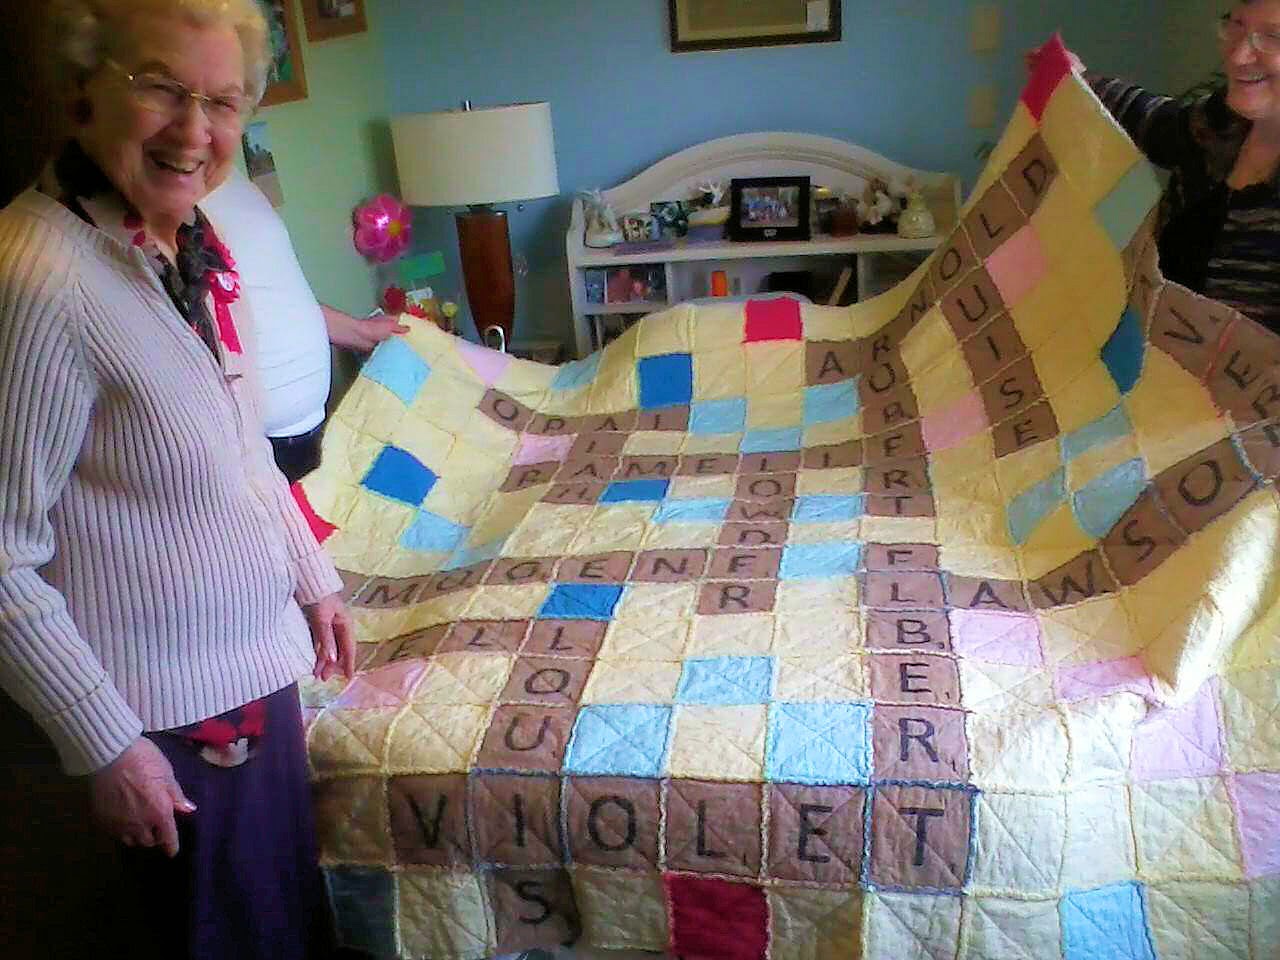
Here's the finished product...


and back...


Unfortunately, we weren't able to make the trip to Michigan for her birthday, but the quilt was delivered by my parents and my aunt.  Here is Grandma with her new quilt.


My parents reported back that she was THRILLED with it and that it was helping her reminisce about her family and her childhood.


MISSION ACCOMPLISHED!!  And - score - it fit on her bed almost perfectly!


My daughter Bug wanted to have a Minecraft sleepover birthday party this year.  As of this writing, there are no licensed Minecraft items for birthday parties - no plates, napkins, treat bags, balloons, cake toppers - nothing.  So, I scoured pinterest and the web, found some ideas and came up with a few easy projects of my own, too.  

Bug decided to make the invitations herself.  She used paper blocks that I cut to create a creeper face.  I used clip art and created the detailed inside.


Next up were the treat bags.


I purchased a six pack of small green fabric bags with handles at Hobby Lobby.  I used scrabble tiles and fabric paint to stamp the face of the creeper onto the bags.


 I then used the edges of a foam paint brush to darken the painted area.


Voila!


Next up were the Marshmallow Peep Creepers, which I wrote about here.


We put the Creeper Peeps in the treat bags along with a square puzzle eraser and two Rainbow Loom Minecraft bracelets that Bug created - a creeper one she designed on her own and a Steve bracelet (see below) she made using this youtube tutorial.


Game wise, they kids brought tablets to play Minecraft, 


...but we also played pin the tail on the pig, using a block pig I made using multiple colors of pink and a square punch.  


Lastly, Bug wanted some kind of Minecraft cake.  I took inspiration from this cake and came up with a similar design that used dairy-free chocolate cake, homemade rice krispie treat blocks, and blue finger jello.  Making a dairy-free frosting that was the right consistancy and flavor for my taste was a challenge (and one I didn't expect), but it turned out pretty tasty.  For the topper, I used a fold-able paper cut out from Cyberdrone at DeviantArt which I altered slightly before printing by putting her face (pixelated, of course) over Steve's.  


Of course we used square green & black plates and green cups. 


And no party is complete without a mustache straw!


We had tacos for dinner and then served Twizzler bites and "window" pretzels to keep with the square Minecraft theme for late night snack. 


I think everyone had a good time and everyone went to sleep before 1am!!
We are headed to Disney again pretty soon.  Even though my girls are getting older, they keep reminding me that they like to have some fun Disney-esque clothes to wear.  We decided to make family t-shirts using freezer paper stencils.  First we downloaded clip art of our favorite characters.  Coloring pages seem to work best since they have thicker lines.
 

We printed out the image, put a piece of freezer paper (shiny side down) over the top and traced the image.  My daughters were able to trace their own characters.  

Then you use an exacto knife and cut out the spaces between the lines.  I do not have the patience or the steady hand for this, but I am married to someone who is!  I wish I'd been able to get a picture of this but he did it while I was putting the kiddos to bed and I didn't get a shot.  Sorry.

Be sure to wash the shirt you are going to use, but do NOT use fabric softener.  The paint will not adhere well if you use fabric softener before you apply the paint.


Next, place the outline on the t-shirt, shiny side down.  Move it to where you want it.  Iron it on to the t-shirt using the low heat setting.  If it isn't sticking after a few swipes, increase the heat slightly.  Make sure to iron the edges very carefully.  If you finish ironing it on and it isn't exactly where you want it to be, carefully peal it off, reposition it, and iron it down again.


Next, use your fabric paint (I used Tulip brand soft paint) and cover your stencil with paint.  Allow it to dry for 4-6 hours before removing the freezer paper.  If you want to do a second coat of paint, let it dry for about 2 hours, apply the second coat and allow to completely dry.


Once you've removed the freezer paper, you can accessorize any way you'd like.  I thought about adding different colors for the collar, tongues, bows, etc., but decided that I really liked them without any additional colors. Once you have completed your fabric painting, be sure to check the paint to see if it needs to be heat set.  Tulip paint does not require heat setting, but suggest you do not wash the shirt for 72 hours. 

Here are our finished shirts.


If you recall, we have made t-shirts using contact paper stencils before.  Since two of the girls had outgrown their shirts, we made a few using the freezer paper technique.  I think the freezer paper version was a bit easier for the more intricate designs, but it was just as easy to do the entire Mickey head with the contact paper.

In this version, we used a toy truck tire to create a bit of texture.  We did the last swipe with a silver glitter color to add a little more dimension.  Ebabe created this one.


For Boo's shirt, I attempted to use a bleach pen to do something a little different, but apparently bleach pens stop working with age.  Who knew?!  No matter what I tried (and this included using liquid bleach on a sponge), the shirt would not bleach.  So, I rewashed it to get any residue out and used fabric paint.  Boo used a dollar store squish ball to create the textured pattern she liked.  She used a combination of white and glitter paints to get the color she liked. 
 

The freezer paper stencil was fairly easy and not too time consuming.  The kids are thrilled with their character shirts and that's what really matters!

We were inspired by this post by The Handmade Home.
About this time last year, I agreed to be the helper for my middle daughter's Girl Scout Troop.  The leader is a good friend of mine and, in August, her husband was diagnosed with Cancer.  Needless to say, when she asked me if I'd take on the leadership of the troop for a while, there was no doubt I would.  This year has been a great experience for me.

One thing I needed to come up with was a caper chart for our troop.  We'd gained some new girls and had bridged to Brownies since I'd made the last one.  I wanted something easy, that the girls would enjoy.


I had each girl create a doppelganger for herself using markers, googly-eyes, yarn, and wooden ice cream spoons.  They had a blast trying to compare hair colors, skin tones, and clothing design.  Once they were done with their icon, we hot glued the eyes and hair to the spoon and a magnet to the back.  I offered to glue the hair down so it wouldn't fly off to the sides, but most of them enjoyed the Muppet-like quality of crazy hair.


I took an old cookie sheet that we had, roughed it up with sand paper and spray painted it Girl Scout green.  I then printed the job titles that work for our group and ran them through my Xyron machine with magnetic backing.

Now I can change the jobs if need be and I can easily move the girls' magnets to whichever job they are responsible for at our meeting.  And, it's easy to carry and store!